Today Salesforce published Winter’15 release notes. The Winter’15 release of Salesforce.com is now in available under pre-release program. On 06th September Sandboxes will be upgraded so that your organization get the look and feel of Winter’15 release. In this release you can find lot’s of enhancement related to Saalesforce1. To maintain clean and accurate data in your organization, Salesforce introduced Duplicate Alerts and Blocking with Data.com. Now you can control whether and when you can allow users to create duplicate records inside Salesforce, customize the logic that’s used to identify duplicates, and create reports on the duplicates you want the users to save. Another big enhancement is Salesforce1 Setup Wizard that allows you for an easy way to complete the essential setup tasks for the Salesforce1 mobile app. The Salesforce1 mobile browser app is supported on Google® Nexus 7™ tablets running Android™ 4.2 or later, as well as Android phones. Below are the quick summary of Winter’15 release from user’s / customer’s
Customer/User’s Point of view :-
1. Ability to convert leads from Salesforce1 app (Beta) : – Now Sales reps can convert, qualified leads to contacts and create opportunities on the fly which helps sales reps to grow their revenue pipeline. This option is available in all versions of Salesforce1. To enable this feature follow the path Setup | Build | Customize | Leads | Settings and select “Enable Conversions on the Salesforce1 App” check-box as shown in the attached screenshot

2. Set Up Salesforce1 with the Salesforce1 Wizard :- The Salesforce1 Wizard provides an simple way to complete the necessary setup tasks for the Salesforce1 mobile app. The wizard is ideal for you if you are new to Salesforce1 and would like a visual tour of its key point-and-click settings.

3. Territory Management 2.0 (GA):- Territory Management 2.0 lets you model your sales territories into a logical and flexible structure that connects sales reps to the accounts they sell to. On few clicks System administrator can enable this feature in new Salesforce organizations and organization created before Winter’15 release need to raise case with salesforce.com support to enable the feature.

4. Duplicate Management (Beta) : – To maintain clean and accurate data in your organization, Salesforce introducedDuplicate Alerts and Blocking with Data.com. It provides a way to control whether and when you want to allow users to create duplicate records inside Salesforce, customize the logic that’s used to identify duplicates, and create reports on the duplicates you do allow users to save.
5 Community Designer (Beta) :- Community Designer allows you to create, brand, and publish a custom community site that looks great on any mobile device! Choose from four templates to quickly start your site, and then easily style the pages to match your company’s branding.
6 Access and Share External Files with Files Connect :- Once you are done with set up Files Connect, you can access files from external data sources like SharePoint, or share them via the Files tab and feed.
7 Unlisted Chatter Groups : - Now you can give your users a more private option for collaboration in Chatter. Unlisted groups offer more privacy compared to private groups, because only members and users with the “Manage Unlisted Groups” permission can access unlisted groups in list views, feeds, and search results. To enable this service follow the path Setup | Build | Customize | Chatter | Settings navigate to Groups section and select “Enable Unlisted Groups” check-box as shown in the below screenshot

8 Allow Attachments via Email : - Now you can allow your user to add attachments while post to groups using email. To enable this feature follow the path Setup | Build | Customize | Chatter | Email Settings and select “Allow Attachments via Email” check-box.
9. Delegated Administrators Can Assign Permission Sets : – After Winter’15 release you can specify permission sets that delegated administrators can assign to users in specified roles and all subordinate roles. This way, you can delegate permission set assignment tasks while maintaining strict control over which permission sets delegated administrators can assign.
10. Supported Languages Changed and Added : – Norwegian (no) is now a fully supported language, andPortuguese (Portugal) (pt_PT) and Slovak (sk) are now end user languages.
11. Process Changed for Enabling Multiple Currencies : – The process for enabling multiple currencies has a new confirmation step. Organizations that are growing and need to track monetary values in multiple countries should find it easier to activate multiple currencies. To approve the activation of multiple currencies in the organization follow the below steps Setup | Administer | Company Profile | Company Information and select check-box “Allow Support to Activate Multiple Currencies” as shown in the below screenshot

12. Security Tokens Required for API Logins from Callouts : – Security tokens are now required for API logins from callouts in API version 32.0 and later. In API version 31.0 and earlier, security tokens are not required by default.
13. File Upload and Download Behavior : – When Don’t allow HTML uploads as attachments or document records is enabled in your organization, users can’t upload .swf and .xhtml file types, in addition to .html, .htt, .mht, and .svg file types.
Developer Point of view:-
1. Improvements to Setup Search (Beta) : – Now you can search for even more individual items, like workflow rules, email alerts, field updates and email templates etc. by name. Advanced Setup Search is automatically enabled in new and existing organizations.
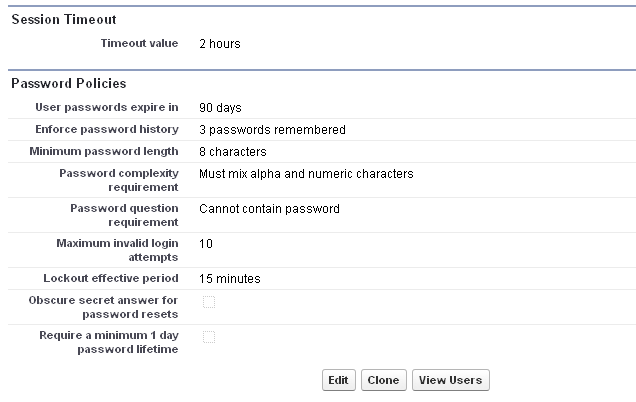
2. Set Session Timeout and Password Policies for Individual Profiles :- Now you can customize the session timeout and password requirements on every profile for better control over the user experience than previous settings applied to the entire organization. The settings for session duration and password policies at the profile
level override the settings at the organization level.
level override the settings at the organization level.
3. Run More Future Methods and Callouts :- The execution limits of future methods and callouts in an Apex transaction have increased to 50 methods and 100 callouts respectively. These limit increases enable you to do more with Apex without having to be restricted by the previous limits.
4. Run More Tests in Sandbox and Developer Organizations :- The test execution limit for asynchronous tests has increased and you can now run twice as many tests in large sandbox or Developer Edition organizations. The increase in the test execution limit increase applies to sandbox organizations in all supported editions and Developer
Edition organizations. This limit is unchanged for production organizations in all other editions.
Edition organizations. This limit is unchanged for production organizations in all other editions.
5. Deploy with Active Jobs :- An option has been added to the Deployment Settings page that lets you deploy components referenced by active Apex jobs. With this option, you don’t have to cancel Apex jobs to be able to have a successful deployment. Previously, deployments failed if they contained components that were referenced by Apex jobs that were pending or in progress.
6. Visual Flow Enhancement :- There are several enhancements in Visual workflow, those are followings
A) Automate Time-Based Processes :- Use the brand-new Wait element to automate processes that require a time-based waiting period. For example, you can create a flow that activates a contract, waits until one day after the contract is activated, and then emails the customer with a feedback form.
B) Store Multiple Values Together in a Flow :- Collection variables allows you to store multiple values together of similar data type. So that you can operate on them by using the new collection variable flow resource. Using collection variables can help you conserve limits by not querying the Salesforce database for that information.
B) Store Multiple Values Together in a Flow :- Collection variables allows you to store multiple values together of similar data type. So that you can operate on them by using the new collection variable flow resource. Using collection variables can help you conserve limits by not querying the Salesforce database for that information.
C) Submit Records for Approval from a Flow (Generally Available) :- With the new Submit for Approval element, you can configure a flow to submit a record for approval without any code. Previously, to do this in a flow you had to write an Apex class and expose it in the Cloud Flow Designer as an Apex Plug-in or Apex trigger. In the ‘Summer’14release, the Submit for Approval element was available only through a pilot program and you could only specify the record to submit.
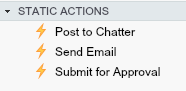
D) Post to Chatter from a Flow :- With the new Post to Chatter element, you can easily configure a flow to post the feed of a record, user, or Chatter group. These posts can include mentions and topics. Previously to create a post from a flow, you had to use an Apex Plug-in or create a FeedItem record.
E) Receive Email for Each Unhandled Fault :- Previously, when multiple interviews resulted in unhandled faults whose messages were similar, the flow creator received an email for only the first unhandled fault. When the “Flow Creators Receive Email for Each Unhandled Fault” critical update is activated, flow creators receive one email for each unhandled fault that occurs. That way, you and other flow creators are aware of every fault that occurs in one of your flows.
7. Visualforce Enhancement :- There are several enhancements in Visual workflow, those are followings
A) Add Data Access to Your Visualforce Pages with Remote Objects :- Remote Objects is generally available. This exciting feature for adding data access to your JavaScript-based Visualforce pages is now supported for production use. There are two new query operators that you can use in your Remote i.e in and nin
B) Preserve sObject Field Encryption in Visualforce Expressions :- For Visualforce pages set to API version 32.0 or later, expressions that reference encrypted sObject fields return the encrypted values instead of the decrypted (plain) values. This behavior more closely matches your expectations and reduces the risk of inadvertent exposure of sensitive data due to programmer error.
B) Preserve sObject Field Encryption in Visualforce Expressions :- For Visualforce pages set to API version 32.0 or later, expressions that reference encrypted sObject fields return the encrypted values instead of the decrypted (plain) values. This behavior more closely matches your expectations and reduces the risk of inadvertent exposure of sensitive data due to programmer error.
C) Serve Static Resources from the Visualforce Domain :- When activated, this update changes the way that your static resources, such as images, JavaScript, and CSS files, are served from Salesforce. To avoid broken references to static resources, make sure that you review our recommended best practices. Prior to the Winter’15 release, some static resources, such as images and CSS files, were loaded from the Salesforce Domain.
8. Refresh Licenses Using the LMA :- Now Salesforce ISV Partners can refresh all customer licenses directly from the License Management App (LMA). This makes it easier for ISV partners to ensure that licenses are up-to-date without having to contact salesforce.com. A license refresh updates the current license information for every installation of a managed package across all Salesforce instances.
9. View More Subscriber Information in the LMA :- The License Management App (LMA) displays additional information such as the status, instance, and expiration date of customer organizations. Partners can view all relevant license details in one place, making it easier to support customers.
9. View More Subscriber Information in the LMA :- The License Management App (LMA) displays additional information such as the status, instance, and expiration date of customer organizations. Partners can view all relevant license details in one place, making it easier to support customers.
10. Now you can include Person Account components and attributes in managed and unmanaged packages.
Salesforce1 Enhancement:-
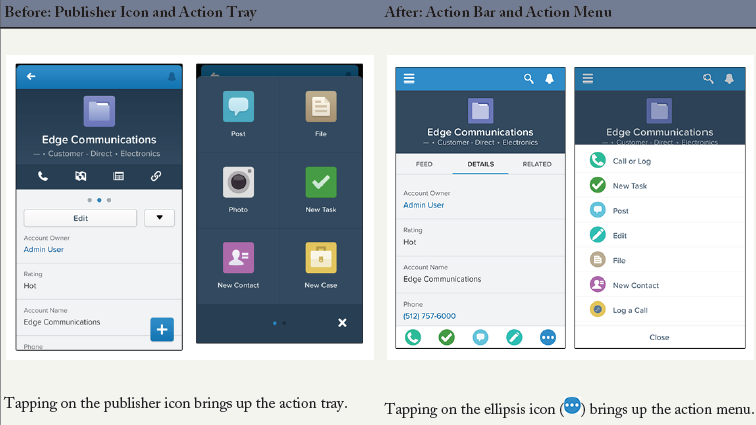
1. Do Most Actions from the Salesforce1 Action Bar :- Mobile users now have a one-stop place to find actions in Salesforce1. We’ve consolidated actions from different places in Salesforce1 into a new home: the action bar.
2. View All Pending Approval Requests in One Location :- Salesforce1 lists all pending approval requests in one central place, making it easy for users to keep track of pending approvals and respond to requests while on the go. like we have “Items to Approve” feature on Salesforce home page. This feature is available in the Salesforce1 mobile browser app only.
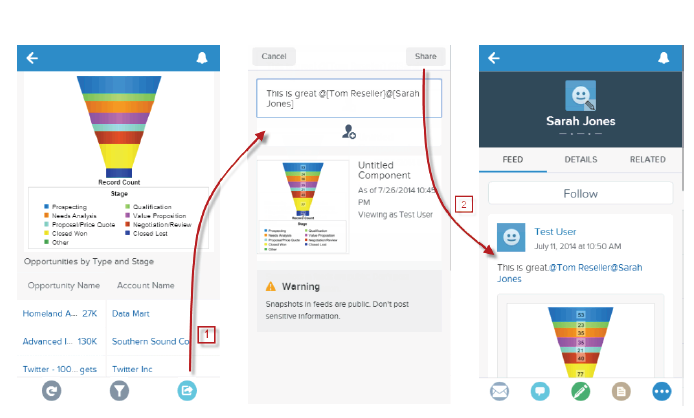
3. Share a Dashboard Snapshot in Chatter :- Salesforce1 mobile browser app allow users to post a snapshot of a dashboard component to Chatter by mentioning a group or a user. When viewed from the mobile browser app, the feed shows a thumbnail preview of the component, along with the comment. Other users reading the feed in the mobile browser app can tap the thumbnail to open the full dashboard.
4. Drill Down from a Dashboard to a Matrix Report:- When viewing a dashboard in any version of the Salesforce1 app, users can tap a dashboard component to see the report that’s delivering the data to the dashboard. This is now available for matrix reports as well as tabular and summary reports. Users can see a maximum of 2,000 records.
5. Floating Report Headers :- When users scroll down to read a report, the header rows at the top stay visible, This is similar feature like we have for Salesforce browser version.
6. Filter List Views:- Salesforce1 mobile browser app users can filter existing list views to see just the records they need, instead of cluttering up Salesforce with even more list views.
7. Attach Files to Comments on Feed Posts :- After Winter’15 user can attach files directly to comment on feed posts using the Salesforce1 mobile browser app, as well as the Salesforce1 downloadable apps. Users can attach files from Salesforce or files stored on a mobile device.
8. Log Calls Faster :- Your sales reps no longer need to fiddle with all the fields in a task record when they’re simply trying to log a call. The Log a Call action available on leads, contacts, and accounts now displays only key fields. This will save your Sales reps time.
9. Events in a Weekly View:- This is one major enhancement in Salesforce1. Events are now available in a weekly view, allowing users to see an event list for a specific day, including previous days instead of having to scroll through a single list of all events. And for Salesforce1 mobile browser app users, it’s now possible to create new events directly from the Events page.
10. Clone Contact Records :- For all versions of Salesforce1, the Clone action is now available on contacts. This action isn’t available for other objects like accounts, however.
Note :- You can download release notes in HTML format! http://goo.gl/TNfhbu and for PDF format http://goo.gl/b3Jbup
Share this:
This entry was posted in Uncategorized, Winter'15 Release and tagged Allow Attachments via Email, Clone Contact Records in Salesforce1, Collection variable, Community Designer Salesforce, Convert lead from Salesforce1, Deploy with Active Jobs,Duplicate Management in Salesforce, Enabling Multiple Currencies in Salesforce, Filter List Views in alesforce1, Floating Report Headers in Salesforce1, Flow enhancement in Winter'15 release, Password Policies for Profiles, Pending Approval Requests in Salesforce1, Permission Sets to Delegated Administrators, Post to Chatter, Refresh Licenses Using the LMA,Remote Objects, salesforce, Salesforce Winter 15 release, Salesforce winter 15 release notes, Salesforce winter 15 release notes HTML, Salesforce winter 15 release notes PDF, Salesforce Winter'15 release, Salesforce winter'15 release notes,Salesforce winter'15 release notes HTML, Salesforce winter'15 release notes PDF, Salesforce Winter'15 release summary,Salesforce Winter15 release quick summary, salesforce.com winter 15, Salesforce1 Wizard, Security Tokens Required for API Logins, Set Session Timeout for profile, SharePoint with Chatter, Submit For Approval, Supported Languages addition in winter 15, Territory Management 2.0 in Salesforce, Territory Management in Salesforce, Unlisted Chatter Groups, View Matrix Report in Salesforce1, winter 15 release key dates, Winter 15 Sales cloud enhancement, Winter 15 Salesforce1 Enhancement,Winter 15 Service cloud enhancement, Winter 15 Visual Workflow enhancement, Winter'15 release, winter'15 release dates,Winter'15 release quick summary, Winter'15 Sales cloud enhancement, Winter'15 Salesforce1 Enhancement, Winter'15 Service cloud enhancement, Winter'15 Visual Workflow enhancement, Winter15 pre-release login url, Winter15 relese notes on HTML, Winter15 relese notes on PDF.
Rakesh Gupta’s Salesforce Newsletter of the Week – 10th August 2014
Articles that you may like
1) Mass Transfer Chatter Files
2) Click and Join Chatter Group
3) Reminder For Chatter Group Pending Membership Requests
2) Click and Join Chatter Group
3) Reminder For Chatter Group Pending Membership Requests
Tip #1 – Chatter Influence Indicator on Profiles
Chatter Influence provides an easier way to see who leading collaboration with their contribution in Chatter for your organization. It shows Chatter activity statistics like how many posts and comments someone’s made, how many comments and likes they have received. Navigate to your user profile page and left hand side you can find Chatter Influence Indicator.

If your organization has Chatter Free User or Chatter External users, they don’t see influence information on their own profiles or anyone else’s, for them it will look like below screenshot

Tip #2 – Chatter Coworker Invitations
Salesforce.com allows organization users to invite their coworkers into Chatter using Chatter Free license. To enable this service follow the below steps
1) Click on Name | Setup | App Setup | Customize | Chatter | Settings
2) Click on Edit and navigate to the Coworker Invitations section
3) Select the check-box Allow Coworker Invitations and add domains, Click on Add More link to add as many as domains you want to add
2) Click on Edit and navigate to the Coworker Invitations section
3) Select the check-box Allow Coworker Invitations and add domains, Click on Add More link to add as many as domains you want to add

4) Click on Save.
Note:- Administrator can add up to 200 email domains to define who can join Chatter for their organization.
Salesforce.com Winter’15 Sandbox Preview Instructions
The Sandbox Preview window for Winter’15 is scheduled to start on the September 5, 2014. If you would like your Sandbox organization to take part in the Winter’15 Preview, your Sandbox must be active on a preview instance bySeptember 5, 2014 to take part in an overall instance upgrade. Gaining early access to Winter’15 is a great way to test out new features and settings before the GA release and upgrade of your production org. It’s also important to be aware of the sandbox preview window should you wish to retain the current release in your sandbox org (to effectively opt-out of the preview)
Preview Windows Refresh Schedule
Use the graphic below to assist in understanding and planning around the preview window refresh schedule. For example, if your Sandbox is on CS3 and you refresh it after 12 AM PST on August 30, 2014, it will be moved to a non-preview Instance, It means to test new features of Winter’15 release your organization has to wait until your production Org will be upgraded to Winter’15 release. To participate in Winter’15 early preview make sure your Sandbox organization is refreshed/Created before 11:59 PM PST on August 29, 2014.

Note:- To learn more about Salesforce.com Winter’15 Sandbox Preview Instructions click on the link. If you want to know about Winter’15 release dates for your org take a look of http://trust.salesforce.com/trust/maintenance/


